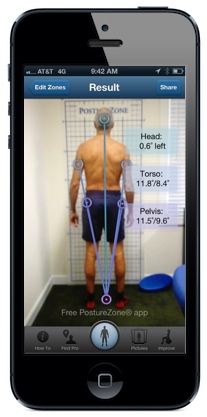
PostureZone has an iPhone/iPad app!
Download at: iTunes PostureZone app
PostureZone App Support (VIDEOS):
- Video How-To
- Interpret Your Results
- PostureZone Pro Version Tutorial
- Use images in your camera roll gallery and save to cases
- More info
- App Review
View FAQs below, if your question isn't answered there submit it through our contact form.
Answers to Frequently Asked Questions:
How do I upgrade to the Pro Version?
Open the PostureZone App, Click the "Improve" icon on the bottom of the screen. Then click the blue "Pro" button (top right). Finally, click to purchase the upgrade.
How can I tell if I successfully upgraded to the Pro Version?
Touch the “Improve” icon on the bottom right of the PostureZone screen. Under the “For Professionals” list, do you see “Access Videos”? If so, you have upgraded successfully!
With the upgrade you’ll also notice email is an option for sharing (not just Facebook and Twitter). With the pro version you can also create a case (or folder) for each picture – entering a name and email for the person you are evaluating. Cases allow you to save multiple pictures for the same person in one folder.
With the upgrade you’ll also notice email is an option for sharing (not just Facebook and Twitter). With the pro version you can also create a case (or folder) for each picture – entering a name and email for the person you are evaluating. Cases allow you to save multiple pictures for the same person in one folder.
How do I delete an image once captured?
From the Pictures Gallery or Case Files – press and hold the image thumbnail until an “X” appears in the top right corner of all images. Press the “X” for each image you want to delete. When done, click any button to navigate away from this screen (this exits the delete mode). Be careful, once deleted the image cannot be recovered.
How do I delete a case?
Click “Pictures” icon at the bottom of screen. Scroll to case you want to remove. Left Swipe the case and a red “Delete” button will appear. Click it and you’re done! Be careful, once deleted the case and images saved within the case cannot be recovered.
How do I delete a case?
Click “Pictures” icon at the bottom of screen. Scroll to case you want to remove. Left Swipe the case and a red “Delete” button will appear. Click it and you’re done! Be careful, once deleted the case and images saved within the case cannot be recovered.
Where do I place the brackets?
How do I export posture assessments to my computer?
With the Pro Version you can email pictures, or export to your computer using iTunes. Click for export instructions: Download and Sync PostureZone App Assessment Images
PostureZone® Bracket alignment
- First move the brackets vertically, and then horizontally.
- You can zoom in and out by double tapping on the brackets
- Start from the bottom PostureZone®
1. Front/ Back view: (Left and right side brackets move independently for Torso and Pelvis, Head and Feet brackets move together)
- Feet:First move the bracket up and down to align vertically with the bottom of the feet . Then move horizontally to align side edge with feet.
- Pelvis: Align top of the bracket with waistband/ belt line vertically, then horizontally to edge of pelvis.
- Torso: Align inside edge of top of the bracket with top of the shoulder, then horizontally to touch torso.
- Head: Center the head by moving marker to touch first vertically, then horizontally. (option: place cross hairs at bridge of nose)
2. Side view: (Left and right brackets move together)
- Feet: Move brackets to center the feet first vertically, then horizontally
- Pelvis: Move brackets to touch the top of the waistband vertically, then touch the pelvis horizontally
- Torso: Front of the bracket should touch the ribcage, back should touch top of shoulder blade.
- Head: Move brackets to center the head first vertically, then horizontally (option: place cross hairs at tip of tragus of ear)
How do I export posture assessments to my computer?
With the Pro Version you can email pictures, or export to your computer using iTunes. Click for export instructions: Download and Sync PostureZone App Assessment Images
How can I learn more about posture assessment and posture correction programs?
- Posture Pictures Course on CEsoup.com is a comprehensive 90-minute course on posture assessments.
- Posture and Balance Assessment, Rehabilitation & Motor Control Exercise hosted by CEsoup.com is a 20 hour CE approved course on posture and provides a complete posture correction program to teach patients or clients.

